Tuesday, July 3, 2012
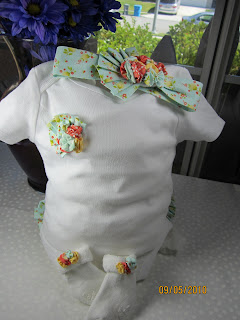
Craftiness (Always in Style): The supplies you will need to make this YoYo Bot...
Craftiness (Always in Style): The supplies you will need to make this YoYo Bot...: The supplies you will need to make this YoYo Bottom Onesie, Headband and corsage along with socks. 1. Tape measure. 2. Scissors. 3. 1...
Saturday, June 30, 2012
The supplies you will need to make this YoYo Bottom Onesie, Headband and corsage along with socks.
1. Tape measure.
2. Scissors.
3. 1/4" Electric for headband.
4. Felt for the YoYo's to be sewn to.
5. thread.
6. Sewing needles.
7. Sew machine.
You will need to cut out as many large 2" circles as you need to make each yo yo puff to go across the bottom of your onesie. I used 5 different fabric for each puff. Set these aside till we do the bottom of the onesie.

Now measure out the fabric your fabric 13" long and 3" wide for the headband.
Fold the fabric for the headband right side to right side and sew down the side.
Turn the band right side out with the seam down the middle and press. Next you will cut the electric 1 1/4" . Turn about a 1/4" of your fabric inside and insert your electric and stitch in place. look at photo
.
Now cut out fabric strips for the pleated fans. for the bottom cut a strip that is 2 1/2 X 15 1/4" and tuck in the ends and fold each pleat and press as you go. For the headband cut 2 1/2" X 10".
As you press each pleat curve the folds as you go to get the fan shape.
Now get you glue gun and have fun! glue all parts to the felt circle.
You will do a smaller circle for the corsage and even smaller for the socks.
Next cut out the felt for the bottom and start stitching all of your fun fans and yoyo's to it.
After you have stitched all of them on lay the felt to the back of your onesie and stitch around the felt to hold it all in place. I also stitched down the middle.
If you would like a PDF of the pattern please send me an e-mail at
wendywest28@yahoo.com.
This little onesie was made for my sweet little Ella.
Have fun and send a post of your onesie.
1. Tape measure.
2. Scissors.
3. 1/4" Electric for headband.
4. Felt for the YoYo's to be sewn to.
5. thread.
6. Sewing needles.
7. Sew machine.
You will need to cut out as many large 2" circles as you need to make each yo yo puff to go across the bottom of your onesie. I used 5 different fabric for each puff. Set these aside till we do the bottom of the onesie.

Now measure out the fabric your fabric 13" long and 3" wide for the headband.
Fold the fabric for the headband right side to right side and sew down the side.
Turn the band right side out with the seam down the middle and press. Next you will cut the electric 1 1/4" . Turn about a 1/4" of your fabric inside and insert your electric and stitch in place. look at photo
.
Now cut 2 out a felt circles and place one behind and the other on top and stitch leaving one side with a small opening for the electric to stretch.
As you press each pleat curve the folds as you go to get the fan shape.
Now get you glue gun and have fun! glue all parts to the felt circle.
You will do a smaller circle for the corsage and even smaller for the socks.
Next cut out the felt for the bottom and start stitching all of your fun fans and yoyo's to it.
After you have stitched all of them on lay the felt to the back of your onesie and stitch around the felt to hold it all in place. I also stitched down the middle.
If you would like a PDF of the pattern please send me an e-mail at
wendywest28@yahoo.com.
This little onesie was made for my sweet little Ella.
Have fun and send a post of your onesie.
Thursday, May 10, 2012
I am so excited to share with you my patented new product, (Pretty Pedestal Stakes)." For those special occasions IN LIFE". Like Birthdays, Weddings, and Bridal Showers, Baby Showers or for a rainy day to make someone smile. So check back often as I share with you creative ideas using Pretty Pedestal Stakes.
"Make smiles and memories using Pretty Pedestal stakes".
To get ready for the 4th of July I will be giving away 2 kits of Pretty Pedestal Stakes in the kit you will receive;
6 Pretty Pedestal Stake wands,
6 Seats,
6 paper liners,
6 paper cups
6 star toppers.
WOW!!! lots of fun stuff to make your 4th of July sparkle .
(To enter: (two possible chances!)
1. (Mandatory Entry) Subscribe to the Pretty Pedestal Stakes.blogspot.com
2. (Mandatory Entry) Then leave a comment sharing how you plan on using Pretty Pedestal Stakes on this post along with your email. (one for each entry).
3. We would also like to post your photos using your creativity with Pretty Pedestal Stakes.
"I'll choose a winner Sunday May 20,2012".
You can email me at wendywest28@yahoo.com
You can email me at wendywest28@yahoo.com
Subscribe to:
Comments (Atom)


